Arduino made easy: Output messages in Morse code!
In my first Arduino “blinking lights” tutorial, I explained how to get a sketch up and running and point some instructions at the Uno’s #13 LED.
In my second tutorial, we broke apart the example code and learned about the functionality of all the methods hidden inside.
Now we are going to learn a bit about Morse code, and teach our Arduino how to pump out an S.O.S signal. Afterwards, maybe we will even look into writing a script to convert our own messages in Morse code!
Morse Code: What is it, and why does it matter?
These days, people text on their phones and call on their phones. But at one point in time, we didn’t have the ability to send such complicated messages over the airwaves. In 1836, an artist Samuel Morse began work on a long-distance communication system he labled the “Telegraph”. The telegraph sent pulses of electricity over a wire, which could be audibly interpreted as “dots” and “dashes”. Alfred Vail, a machinist in the 1800′s sought to standardize this telecommunicaiton format by researching the most commonly used words and assigning their letters shorter combinations of dashes and dots than their lesser used counterparts. This led to a very efficient method of communication that is extremely easy to implement and doesn’t hurt the bandwidth. Today, Morse code is still used on ships and airplanes for brief communications.
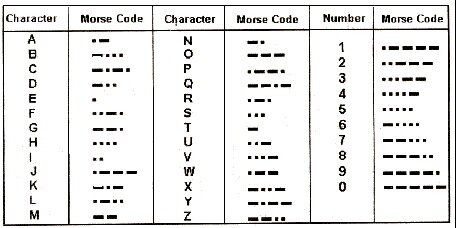
Today’s standardized Morse code is as follows:
As you can see, “S” is written as three dots, and “O” is written as three lines.
So our output for this project must be: · · · – – – · · ·, (dot, dot, dot, dash, dash, dash, dot,dot,dot).
S.O.S is an internationally recognized distress signal, and an excellent starting point for our Arduino project!
Since we already understand the basics of our digitalWrite(), and delay() methods – we just need to move them around to write a simple hard coded S.O.S.
Morse-SOS-Sketch
|
1
2
3
4
5
6
7
8
9
10
11
12
13
14
15
16
17
18
19
20
21
22
23
24
25
26
27
28
29
30
31
32
33
34
35
36
37
38
39
|
/*
Morse SOS
*/
// the setup function runs once when you press reset or power the board
void setup() {
// initialize digital pin 13 as an output.
pinMode(13, OUTPUT);
}
// the loop function runs over and over again forever
void loop() {
for (int a = 0; a < 3; a++) {
dot();
}
for (int b = 0; b < 3; b++) {
dash();
}
for (int c = 0; c < 3; c++) {
dot();
}
}
void dot()
{
digitalWrite(13, HIGH);
delay(250);
digitalWrite(13, LOW);
delay(250);
}
void dash()
{
digitalWrite(13, HIGH);
delay(1000);
digitalWrite(13, LOW);
delay(250);
}
|
We created two new methods, dash() and dot(). These methods do exactly what you would expect- produce one(1) dash or one(1) dot. Above in our main loop(), we produced three basic for loops each iterating through the range 0-3 a single time. Once all three loops are completed the main loop resets.
And now we have a very basic S.O.S running on our Arduino!
Console report on Arduino Uno v3:
Sketch uses 1,106 bytes (3%) of program storage space. Maximum is 32,256 bytes.
Global variables use 9 bytes (0%) of dynamic memory, leaving 2,039 bytes for local variables. Maximum is 2,048 bytes.
Next up, I’m gonna write a script to convert your own words to Morse code comprised of dot() and dash() so you can send your own messages out through your Arduino!


Trackbacks & Pingbacks
[…] that we have an understanding of what is actually going on here, head over to part three and we will finish up by sequencing the blinks in a way such that they spell out SOS (or anything […]
Leave a Reply
Want to join the discussion?Feel free to contribute!